The Protolis guide to 3D printing
Method Type
Jump to current chapter
Current Chapter
- The basics of 3D printing
- What is 3D printing?
- How does the 3D printing process work?
- What are the different types of 3D printing?
- History of 3D printing
- What are the advantages of 3D printing?
- What are the limitations of 3D printing?
- Materials for 3D printing
- What are the main materials for 3D printing?
- How to choose the right 3D printing material
- What are the possible surface finishes for 3D-printed parts?
- Why is 3D printing finishing important?
- Understanding surface finish measurement in 3D printing
- Evaluating surface roughness
- Common applications of 3D printing
- Best design practices for 3D printing
- Base edges optimization
- Managing overhangs effectively
- Effective Bridging Techniques
- Corner design for stability
- Right clearance for assembled Parts
- Feature sizing for reliability
- Surface detailing for visibility
- Precise thread
- Hollow out 3D models
- Cost optimisations for 3D printing
- Conclusion
The basics of 3D printing
3D printing, an innovative manufacturing process, enables the creation of complex, three-dimensional objects directly from digital blueprints. This guide explores the nuances of 3D printing, from its fundamental principles and types to materials used and best design practices. With an emphasis on optimizing production costs without sacrificing quality, we delve into strategies for selecting appropriate materials, leveraging existing designs, and refining printing parameters for use in various industries, including medical, aerospace, automotive, and consumer goods.
What is 3D printing?

Figure 1: 3D printing structure
3D printing, also known as additive manufacturing, crafts three-dimensional objects from digital files. This method constructs objects by adding material layer upon layer, much like printing ink on paper, but in a three-dimensional space. Each layer forms a thin slice of the final object, allowing for intricate designs with less waste than traditional manufacturing.
Unlike subtractive methods, which remove material from a solid block, 3D printing builds objects up. An emerging technique, volumetric 3D printing, diverges by creating objects in a single step, although it remains largely experimental. This approach streamlines production, offering efficient solutions for complex geometries.
How does the 3D printing process work?

The 3D printing process transforms digital designs into tangible objects through a series of detailed steps. Here’s an overview of the process:
Initially, designers craft a 3D model using advanced software like Fusion 360, SolidWorks and Blender. This crucial step converts conceptual ideas into precise digital blueprints, laying the foundation for the printing process.
Following the design, the model is exported as an STL file, the preferred format for 3D printing. The STL file format is crucial as it encapsulates the surface geometry of the model without preserving color, texture, or other non-geometric attributes.
Following the export, the STL file undergoes a slicing process, where slicing software converts the model into a series of thin layers and generates G-code. This code instructs the 3D printer on constructing each layer, specifying parameters such as movement speed, temperature, and layer height.
At this point, the choice of material is made, which can significantly influence the object’s properties. The selection ranges from flexible plastics and durable metals to innovative ceramics and composites tailored to the specific requirements of the end product.
Before printing, critical parameters such as print speed, layer height, fill density, and extrusion temperature are meticulously adjusted. These settings are fine-tuned to balance print quality with time efficiency, ensuring optimal outcomes.
In the final step, the printer embarks on the actual printing process, methodically laying down material layer by layer. This additive process gradually constructs the object from the ground up, culminating in a physical manifestation of the digital model.
Each enhanced step underscores the meticulous attention to detail and the technological sophistication inherent in 3D printing.
What are the different types of 3D printing?
The ISO/ASTM 52900 standard categorizes 3D printing into seven distinct groups. Each method offers unique benefits and operates differently, expanding the technology’s versatility. Let’s examine the seven key types.
| Type | Dimensional Accuracy | Applications | Finishing | Lead Time | Cost |
| Powder Bed Fusion (PBF) | 0.1 – 0.3 mm (±0.0039 – 0.011 in) | Complex parts, aerospace, automotive | Requires post- processing | Medium | High |
| VAT Photopolymerization | ±0.1 mm (±0.0039 in) | Prototypes, dental, jewelry | High detail requires cleaning | Short | High |
| Fused Deposition Modeling (FDM) | ±0.5 mm (±0.0196 in) | Prototyping, educational models | Rough, often needs post-processing | Short | Low |
| Binder Jetting | ±0.2 mm (±0.0078 in) | Molds, full-color prototypes | Varies, often requires post-processing | Medium | Medium |
| Material Jetting | ±0.1 – 0.02 mm (±0.0039 – 0.0078 in) | High-detail parts, prototypes | High, may need post-processing | Short | High |
| Sheet Lamination | ±0.15 mm (±0.0059 in) | Metal parts, prototypes | Depending on the material, it may require post-processing | Medium | Medium |
| Direct Energy Deposition (DED) | ±0.1 mm (±0.0039 in) | Repair, large parts | Good, may require minimal post- processing | Medium | High |
This method uses thermal energy, like a laser, to fuse areas in a powder layer. A roller spreads the powder, and the laser binds it in designated patterns. Each layer builds upon the previous one until the object is complete. Selective laser sintering (SLS) and direct metal laser sintering (DMLS) are notable examples.
- SLS layers powder and uses a laser to sinter it. This method is ideal for plastic parts, allowing the creation of complex shapes without additional support.
- DMLS and selective laser melting (SLM) operate similarly to the SLS method but with metal powders. It requires post-process support removal and possible thermal treatment to enhance the mechanical properties of the printed part.
Each method brings forth the ability to fabricate parts with complex internal features and geometries unachievable through traditional manufacturing techniques. It underlines the transformative impact of PBF technologies in additive manufacturing.
This category includes digital light processing (DLP) and stereolithography (SLA), which cure liquid resin layer by layer using light. DLP projects an entire layer’s image, while SLA uses a point laser. Finished objects need cleaning and further light exposure to strengthen. While offering high detail and finish, the produced items may be brittle and degrade under UV light. Support structures are often needed and can leave marks after removal.
FDM employs a heated nozzle to extrude thermoplastic filaments, layer by layer. The material softens and is placed precisely, hardening upon cooling. This method is known for its cost efficiency and quick turnaround. However, the output may lack dimensional accuracy and surface smoothness, often requiring further post-processing. FDM-printed objects tend to be weaker in one direction, limiting their use in critical applications.
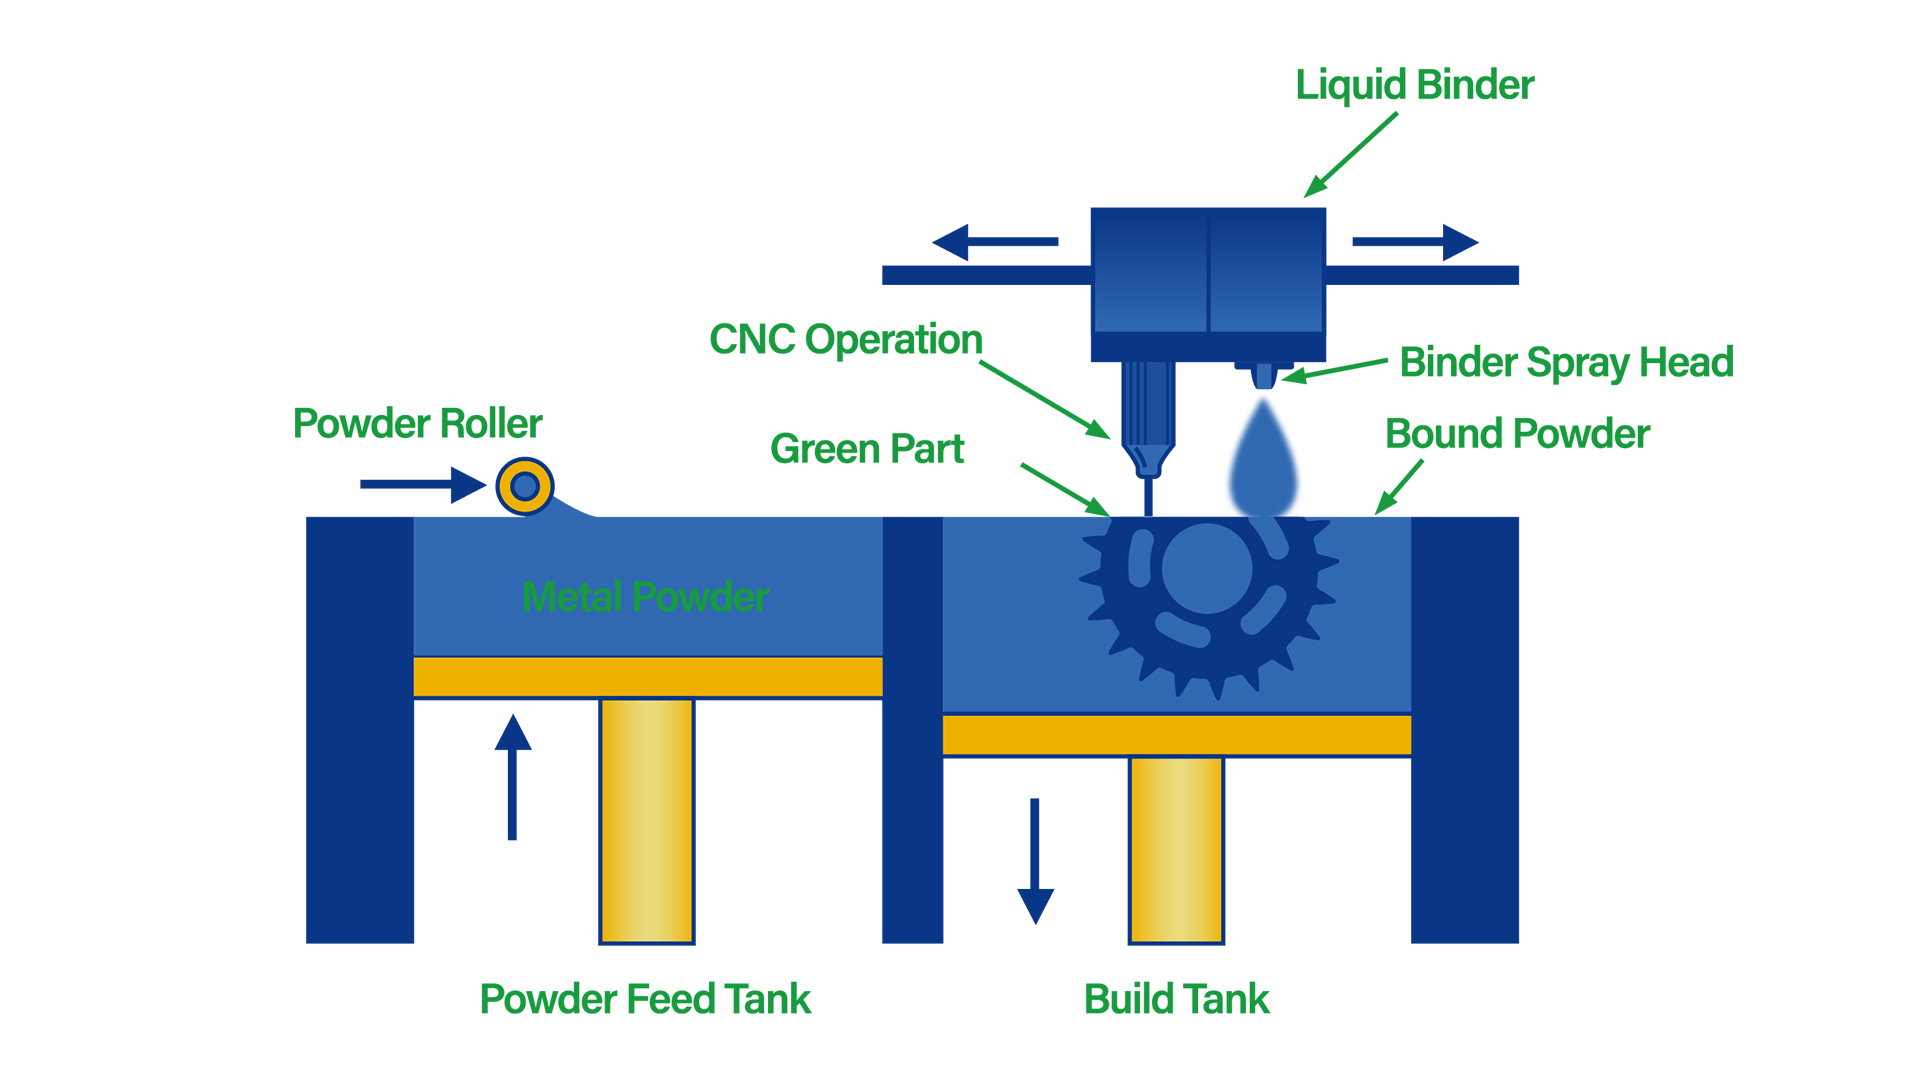
This method layers powdered material, like metal or ceramic, on a platform. A print head then applies a binder to solidify the layer. For metals, post-processing often involves thermal sintering or infiltration with a lower-melting-point metal to ensure strength. Ceramic and polymer parts might be stabilized using adhesives. This versatile technique supports large molds, colorful prototypes, and complex metal structures.
Operating similarly to traditional inkjet printing, this process jets liquid material layers, solidifying sequentially. It achieves high precision and can produce parts in full color using various materials. Support structures are easily removable because they’re water-soluble and support overhangs during printing. While offering detailed outputs, the process is expensive, and the products may be brittle.
Distinguished in ultrasonic additive manufacturing (UAM) and laminated object manufacturing (LOM), this process builds objects by layering sheets of material, adhered or welded together.
- UAM utilizes ultrasonic welding to combine metal sheets without high temperatures, suitable for materials like stainless steel and aluminum.
- LOM stacks and adhesively bonds layers of paper or plastic, creating objects that are then cut to shape.
Employing focused thermal energy, DED melts material—powder or wire—directly where the part is being constructed. Suitable for repairing or adding material to existing components, it works with a range of materials, including metals and polymers. The process is dynamic, allowing for the construction of parts with complex geometries and internal structures.
Each of these processes showcases the adaptability of 3D printing technology, catering to diverse applications from prototyping to functional part production across various industries.
History of 3D printing
3D printing techniques have evolved dramatically, changing how we manufacture and design. Let’s understand the 3D printing progress in detail.
How did 3D printing start?
- 1981: Dr. Hideo Kodama invents one of the first rapid prototyping machines, using UV light to harden resin layer by layer.
- 1986: Chuck Hull files the first stereolithography (SLA) patent, introducing the .stl file format, foundational for 3D printing.
- 1988: Carl Deckard at the University of Texas develops selective laser sintering (SLS), advancing laser-based powder fusion.
- 1989: Scott Crump patents fused deposition modeling (FDM) and found Stratasys, becoming a key figure in 3D printing.
- 1990s: The decade sees growth in the 3D printing industry, with new companies and technologies emerging.
- 2005: The RepRap Project launches, aiming for a low-cost, self-replicating 3D printer, significantly impacting the accessibility of 3D printing.
- 2006: The first commercial SLS printer becomes available, and key FDM patents expire, leading to a surge in 3D printing innovation.
- 2009: Makerbot was founded to make 3D printing more accessible to the public and launch Thingiverse, a vast online 3D printing community.
- 2018: The International Space Station prints the first tool in space with a 3D printer, demonstrating the technology’s potential in new environments.
- 2023: A significant shift towards more advanced materials is observed, from biodegradable plastics to metal alloys and ceramics, enhancing the versatility and sustainability of 3D printing applications.
This updated timeline encapsulates the significant milestones and advancements in 3D printing technology, highlighting its evolution from conceptual beginnings to a tool for modern manufacturing and beyond.
What are the advantages of 3D printing?
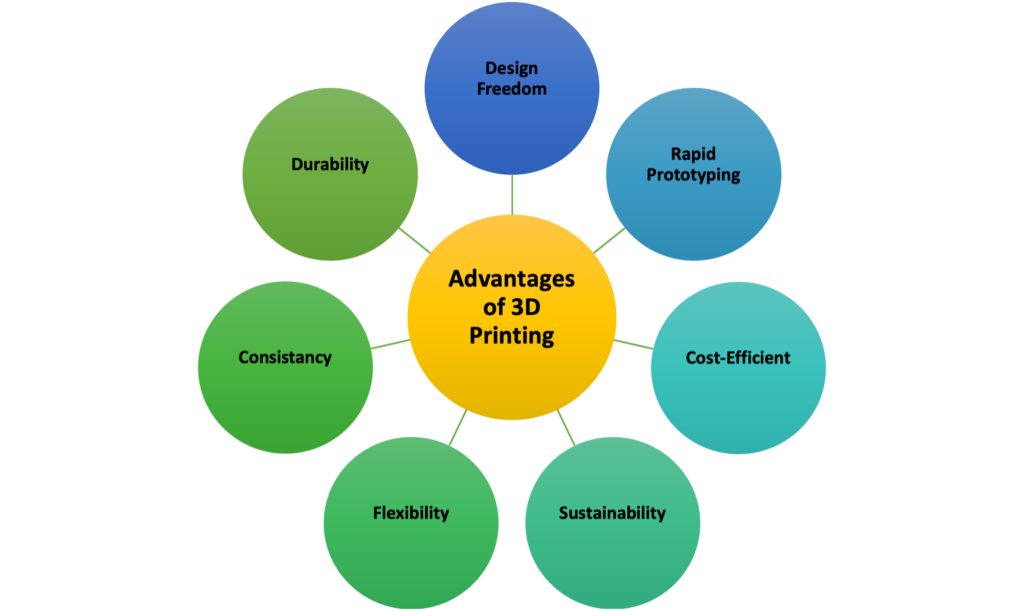
3D printing stands out for its ability to transform how we create, innovate, and produce. It offers several compelling advantages.
● Design freedom
This technology unlocks unparalleled design flexibility. Once impossible or costly to make complex structures through traditional methods, they are now achievable. It allows for intricate geometries, including internal features and channels, without additional complexity or expense. Designers and engineers can truly push the boundaries of creativity and functionality.
● Rapid prototyping
Speed is a hallmark of 3D printing. Ideas can move swiftly from digital models to physical prototypes within hours. This rapid turnaround accelerates the development cycle, enabling quicker feedback and iterations. It significantly reduces the time to market, offering a competitive edge in fast-paced industries.
● Cost-effectiveness
3D printing is economically advantageous, especially for small-batch production and prototypes. Traditional manufacturing methods often require expensive molds or tools, making them cost-prohibitive in the short run. In contrast, 3D printing eliminates such upfront costs, as it builds objects directly from digital files. This process reduces waste and can lower material costs, making high-quality production accessible to businesses of all sizes.
| Technology | Number of Parts Manufactured |
| 3D printing | Up to 10 |
| 3D Printing and CNC Machining | 10 – 100 |
| CNC Machining and Injection Molding | 100 – 1000 |
| Injection Molding | +1000 |
● Sustainability
3D printing stands at the forefront of eco-friendly manufacturing processes. Adding material layer by layer minimizes waste compared to traditional subtractive methods, where excess material is removed and often discarded.
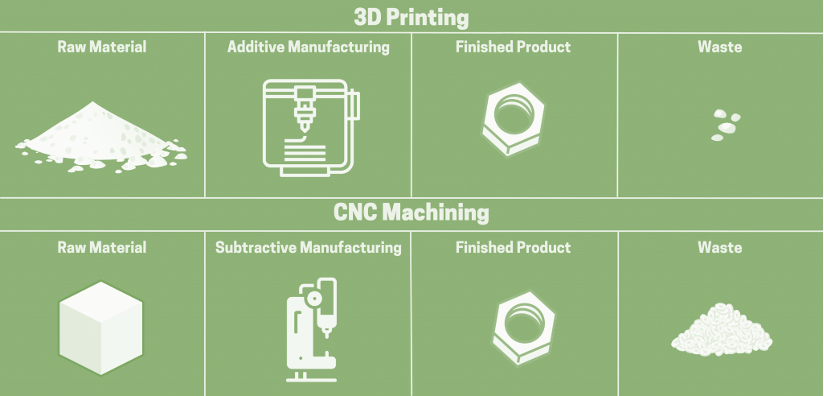
Figure 9: Comparing 3D printing with CNC machining
Additionally, the ability to produce parts on demand reduces overproduction and inventory, further decreasing the environmental footprint. Many 3D printing materials are recyclable or biodegradable, promoting a cycle of reuse and sustainability.
● Versatility
The adaptability of 3D printing is unmatched. It supports a wide range of materials, including plastics, metals, and composites, allowing for creating parts with specific properties tailored to their application. This versatility extends to production, where manufacturers can easily switch between materials and models without tooling changes, efficiently accommodating custom orders and small batches.
● Consistency
High-quality 3D printers deliver exceptional precision and repeatability. Once a design is finalized, each print can reproduce the part with little to no variation, ensuring consistency across batches. This reliability is crucial for industries where precision is paramount, such as aerospace, medical devices, and automotive.
● Durable and lightweight parts
3D printing technologies enable the design of strong and light parts. Advanced materials and techniques, such as honeycomb structures, allow for parts that withstand significant stress while reducing weight. This attribute is especially beneficial in sectors like aerospace and automotive, where the strength-to-weight ratio is a critical factor in performance and fuel efficiency.
These advantages highlight 3D printing’s role as a transformative force in manufacturing, offering a path toward more sustainable, flexible, and efficient production. It’s reshaping industries, driving innovation, and setting new standards for environmental responsibility, product quality, and design possibilities.
What are the limitations of 3D printing?
While 3D printing offers groundbreaking advantages, it’s essential to recognize its limitations. Understanding these constraints is crucial for leveraging the technology effectively.
Although the range of materials for 3D printing is expanding, it remains relatively limited compared to traditional manufacturing. Certain plastics, metals, and composites are 3D printable, but the spectrum is narrower, especially for applications requiring specific material properties like conductivity or flexibility. This limitation can restrict the technology’s application in some sectors.
Many 3D-printed parts require additional finishing to meet the desired standards. This can include sanding to smooth surfaces, removing support structures, or sealing to strengthen the part. Such post-processing adds time and labor to manufacturing, potentially offsetting some of 3D printing’s speed and cost advantages.
The printer’s build volume limits the size of objects that can be 3D printed. While large-format printers exist, they are significantly more expensive and less common than standard sizes. This limitation poses challenges for producing large components, often necessitating the division of parts into smaller segments that must be assembled post-printing.
3D printing excels in prototyping and small-scale production. However, it becomes less cost-effective for large-volume manufacturing. Traditional methods like injection molding maintain a cost advantage at scale, offering faster production rates and lower costs per unit for high quantities.
The ease of replicating objects with 3D printing brings legal and ethical concerns. Unauthorized copying or modification of protected designs can infringe on intellectual property rights. Additionally, there’s uncertainty around the regulation and liability of 3D printed items, especially those used in critical applications. Ensuring compliance and respecting copyrights remain significant challenges.
While 3D printing is precise, it may not match the accuracy levels of CNC machining. For example, Direct Metal Laser Sintering (DMLS) typically achieves an accuracy of around 0.4 mm (0.015 in) compared to CNC’s 0.025 mm (0.0010 in). This difference can be crucial for applications demanding high precision, affecting the suitability of 3D printing for specific tasks.
Understanding these limitations is key to making informed decisions about when and how to use 3D printing. It’s a powerful tool with specific applications, but it’s not a one-size-fits-all solution for manufacturing needs.
Materials for 3D printing
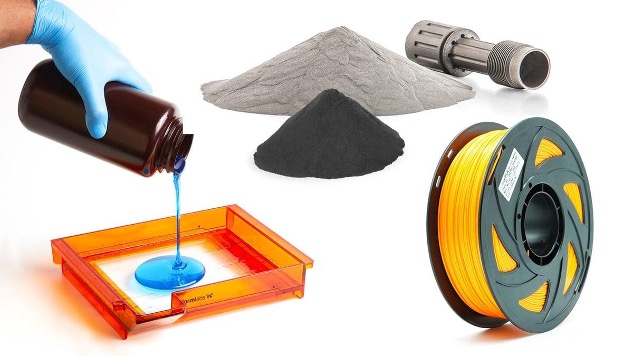
Figure 10: 3D printing plastics
Selecting the appropriate material in 3D printing significantly influences the part’s mechanical properties, functionality, and aesthetics. While the choice of printing technology sets the foundation, the materials bring the design to life, ensuring it meets the intended user’s requirements. The material determines the final outcome’s success, from durability and flexibility to color and texture.
Therefore, understanding the capabilities and limitations of available materials is essential. It enables designers and engineers to make informed decisions, optimizing the product for its specific application while balancing cost and performance. This strategic selection is key to leveraging 3D printing’s full potential.
What are the main materials for 3D printing?
Selecting the appropriate 3D printing material is crucial for achieving the desired outcome. Each material offers distinct properties that cater to different needs, ranging from mechanical strength to aesthetic appeal. Here’s a deeper look at the main materials:
Plastics
Widely used in 3D printing, plastics offer a balance of flexibility, durability, and ease of printing. They’re preferred for prototyping and end-use applications due to their adaptability to various needs.
● ABS (Acrylonitrile Butadiene Styrene)
ABS combines toughness with heat and impact resistance, making it a popular choice for functional prototypes and end-use parts. It requires a heated print bed to prevent warping and should be used in well-ventilated areas due to potential fume emission during printing.
● PLA (Polylactic Acid)
As the most accessible material for FDM printers, PLA is appreciated for its rigidity, strength, and environmentally friendly profile, being derived from renewable resources. It’s less heat resistant and more brittle compared to ABS but offers a smoother finish and is ideal for concept models and prototypes that emphasize aesthetics.
● PETG (Polyethylene Terephthalate Glycol)
This material is known for its ease of printing, combining PLA’s simplicity with ABS’s strength and durability. PETG is resistant to moisture and chemicals, has high transparency, and can be used for food-safe applications. Its versatility makes it suitable for various uses, including waterproof containers and durable, snap-fit parts.
● Nylon
Renowned for its strength, flexibility, and durability, nylon is ideal for creating parts that require resilience and impact resistance. While it offers excellent wear resistance and can be dyed post-printing for visual customization, nylon’s hygroscopic nature means it absorbs moisture from the air, which can affect printing quality if not stored properly.
● TPU (Thermoplastic Polyurethane)
TPU stands out for its flexibility and elasticity, combined with impact resistance. It excels in applications requiring durable, flexible prototypes or parts that must withstand mechanical stress and vibration, making it ideal for items like flexible phone cases or shock-absorbing components.
● PVA (Polyvinyl Alcohol)
PVA is primarily used as a soluble support material. Its ability to dissolve in water makes it perfect for complex prints, where traditional support removal would be challenging. This property simplifies the post-processing stage, especially for intricate designs with internal structures.
● Polypropylene
Known for its flexibility and durability, polypropylene is chemically resistant and watertight. Its versatility makes it a go-to for functional prototyping, end-use parts, and medical devices, offering a blend of performance and safety.
● HIPS (High Impact Polystyrene)
Similar to PVA, HIPS serves as a support material, but it dissolves in limonene, making it a companion for ABS prints. Its solubility allows for the clean removal of supports, facilitating the creation of parts with overhangs or internal cavities.
Composites
Composites enhance basic printing materials with added properties such as increased strength, heat resistance, or electrical conductivity. They push the boundaries of what 3D-printed objects can endure and achieve.
● Carbon Fiber, Kevlar, Fiberglass
Composite materials enhance the strength, rigidity, or toughness of 3D-printed parts. These materials are typically used in industrial-grade FDM printers due to their abrasive nature and need for specialized extrusion hardware. Applications include functional prototypes, jigs, fixtures, and tooling that require enhanced mechanical properties.
● Nylon composites
Nylon composites enhance nylon’s capabilities by incorporating materials like glass, aluminum, or carbon fiber. These additions boost strength and rigidity, making the composites ideal for robust prototyping and durable structural parts. Such advancements extend 3D printing’s utility in creating functional, high-performance components across various applications.
Resins
Utilized for their precision and finish, resins produce parts with high detail and smooth surfaces. Ideal for intricate designs, they cater to applications requiring aesthetic appeal and fine features.
● Standard resins
These materials are celebrated for their high resolution and ability to achieve a smooth, matte surface finish. They are ideally suited for concept models and prototypes that require fine detail and a polished appearance.
● Clear resin
This is the go-to material for applications needing optical clarity. After polishing, it can achieve near-optical transparency, making it perfect for parts requiring light transmission, such as lenses and millifluidic devices.
● Draft resin
Designed for speed, Draft Resin enables rapid prototyping at a pace significantly faster than standard resins and FDM printing. This material is excellent for iterating designs quickly, allowing for multiple revisions in a short timeframe.
● Tough and durable Resins
These materials are engineered to mimic the mechanical properties of conventional engineering plastics like ABS or PE. They excel in applications where parts must endure compression, stretching, bending, or impacts. Suitable uses include making durable housings, enclosures, jigs, fixtures, connectors, and prototypes expected to withstand wear and tear.
● Rigid resins
These materials are designed to resist bending, offering high strength and stiffness. They are thermally and chemically resistant, maintaining dimensional stability under load. Ideal for creating durable jigs, fixtures, tooling, and parts like turbines, fan blades, and automotive housings that must withstand rigorous use.
● Polyurethane resins
Known for their long-term durability, these resins stand up to UV light, temperature variations, and humidity. They also offer flame retardancy and resistance to chemicals and abrasion. This makes them suitable for high-performance components in automotive, aerospace, and machinery, as well as robust end-use parts and functional prototypes.
● High temp resin
As the name suggests, this resin can endure high temperatures, making it perfect for hot air, gas, and fluid flow applications. Its precision allows for creating heat-resistant mounts, housings, fixtures, and molds that require dimensional stability at elevated temperatures.
● Flexible and elastic resins
Mimicking the properties of rubber, TPU, or silicone, these resins can bend, flex, and compress, ideal for applications requiring durability and flexibility. They are used in consumer goods prototyping, compliant features for robotics, medical devices, and even special effects props and models, proving their versatility across industries.
● Silicone 40A resin
This groundbreaking material brings the benefits of traditional silicone to 3D printing. It’s ideal for creating functional prototypes, custom medical devices, and flexible tools with the same properties as cast silicone. Its versatility allows small-batch production of parts requiring silicone’s unique flexibility and durability.
● Medical and dental resins
Engineered for safety and compatibility, these biocompatible resins are used to produce precise medical and dental applications. They enable the fabrication of surgical guides, dentures, and prosthetics, meeting the rigorous standards required in medical and dental practices.
● Jewelry resins
Tailored for the jewelry industry, these resins offer high detail, ease of casting, and excellent shape retention. They’re perfect for crafting try-on pieces, masters for molds, and custom jewelry, allowing artisans to bring intricate designs to life with precision and clarity.
● ESD resin
Specifically designed for electronics manufacturing, ESD (electrostatic discharge) safe material prevents static build-up. It’s used to make tooling, fixtures, anti-static prototypes, and end-use components requiring ESD safety, including custom trays for handling sensitive electronic components.
● Flame retardant (FR) resin
This material is engineered for safety in high-risk environments. It’s flame retardant, heat-resistant, and suitable for parts requiring strict safety standards, like interior components in transportation or industrial settings.
● Alumina 4N resin
Offering 99.99% pure alumina, this technical ceramic boasts excellent thermal and mechanical properties. It’s ideal for creating parts that withstand extreme conditions, serve as heat or electrical insulators, and are in applications demanding high chemical resistance.
Metals
In 3D printing, metal materials stand out for their robustness and versatility. Each type brings unique properties suited for specific applications.
● Titanium
It is renowned for its strength-to-weight ratio, making it ideal for aerospace, automotive, and medical devices. Its resistance to heat, oxidation, and acids ensures durability in challenging environments.
● Stainless steel (SS)
Stainless steel offers a combination of strength and ductility, making it suitable for a wide range of applications. Its corrosion resistance makes it a preferred choice for medical instruments and outdoor components.
● Aluminum
Aluminum is favored for its lightweight yet strong characteristics, alongside good thermal properties. It’s widely used for high-performance and weight-reduction parts in the automotive and aerospace industries.
● Tool steel
Tool steel is distinguished by its hardness and scratch resistance, and it is suitable for manufacturing end-use tools, molds, and parts demanding high durability and wear resistance.
● Nickel alloys
They are characterized by their exceptional strength at high temperatures and resistance to corrosion and oxidation, making them ideal for demanding industrial applications, including aerospace and energy sectors.
How to choose the right 3D printing material
Choosing the suitable material for 3D printing involves thoroughly understanding your project’s requirements. Here’s a straightforward approach to ensure you select the most suitable material.
Step 1: Identify your part’s requirements
Identify how your part will be used and the stresses it will endure. This could range from simple prototypes to parts that face rigorous real-world conditions. Materials vary widely in their properties, so understanding the intended application is crucial. For example, prototypes might only require basic properties like a good surface finish, whereas end-use parts need to withstand wear, heat, or chemical exposure.
| Level of Performance | Material and Technology Recommendation |
| Basic | FDM using PLA; SLA with standard or clear resins for transparency; draft resin for speed |
| Intermediate | FDM with ABS; SLA using engineering resins; SLS with nylon or TPU for flexibility |
| Advanced | FDM with composite materials; SLA using specialized resins like medical or dental; SLS with high-durability nylon or composites |
Step 2: Match requirements with material properties
Once you know what your part needs to do, match these requirements to material properties. This involves considering factors such as tensile strength for load-bearing parts or heat resistance for components exposed to high temperatures. Each material’s data sheet provides essential insights, helping you compare and narrow down your choices based on technical specifications.
| Requirement | Description | Material and Technology Recommendation |
| Tensile Strength | Necessary for parts under tension; higher values indicate better structural capacity | FDM: PLA; SLA: Rigid resins; SLS: Nylon composites |
| Flexural Modulus | Indicates material stiffness or flexibility under load | FDM: PLA (stiff), ABS (moderate); SLA: Rigid resins (stiff), flexible resins (flexible); SLS: Nylon (varied) |
| Elongation at Break | Measures material elasticity before breaking | FDM: TPU (high); SLA: Flexible and elastic resins; SLS: TPU and nylon variations |
| Impact Strength | Material’s capacity to absorb energy without breaking | FDM: ABS, nylon; SLA: Tough and durable resins; SLS: Nylon variations |
| Heat Deflection | Temperature at which material deforms under load | SLA: High temp resin; SLS: Nylon composites for higher temperature resistance |
| Hardness | Surface resistance to deformation; softer materials have lower values | FDM: TPU; SLA: Silicone 40A resin for soft applications; SLS: TPU for flexible needs |
| Tear Strength | Resistance to tear propagation; crucial for flexible materials | FDM: TPU; SLA: Flexible and elastic resins; SLS: TPU |
| Creep Resistance | Material’s ability to resist permanent deformation under constant load | FDM: ABS for low creep; SLA: Rigid resins; SLS: Nylon composites for structural parts |
| Compression Set | Material’s ability to return to original shape after compression | FDM: TPU for low set; SLA: Silicone 40A resin; SLS: TPU for high elasticity |
Step 3: Finalize your material choice
After aligning material properties with your part’s requirements, you’ll likely have a shortlist of suitable materials. If multiple options meet your primary needs, consider secondary characteristics like aesthetic qualities or cost-effectiveness. This final step involves weighing the pros and cons to make an informed decision that balances performance with practical considerations like availability and compatibility with printing technology.
Following this framework, you can systematically choose the most appropriate 3D printing plastic, ensuring your project meets its functional and aesthetic goals.
What are the possible surface finishes for 3D-printed parts?
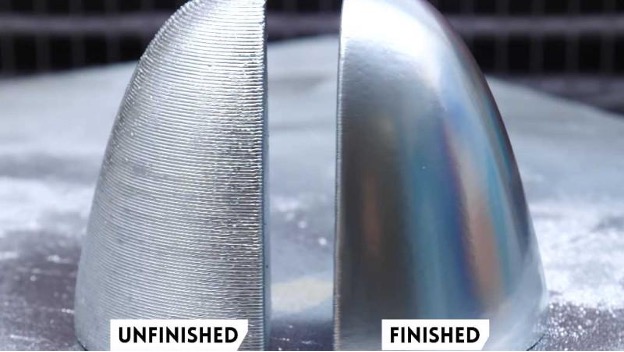
Figure 11: Unfinished vs. finished 3D printed parts
Enhancing 3D-printed parts with the right finish can transform their appearance, functionality, and durability. Various finishing options cater to different needs, from aesthetic improvements to functional enhancements.
This method involves coating a part with a thin metal layer, such as nickel, copper, gold, or silver, through electrical or chemical processes. Plating can significantly increase a part’s strength, durability, and resistance to wear and corrosion, making it ideal for components that require a tough exterior. It also enhances the part’s visual appeal with a metallic finish and can add functional properties like electrical conductivity.
A basic yet effective finishing technique, sanding smooths the surface of a printed part, removing layer lines and minor imperfections. This process is crucial for parts requiring a high-quality finish or further treatments like painting. While sanding can be time-consuming, especially for intricate designs, it’s essential for achieving a polished look.
To reach difficult spots that sanding can’t, bead blasting uses fine particles to even out the surface. This method is faster than sanding and achieves a uniform matte finish, preparing the part for further finishing processes or improving its aesthetic.
Applying heat treatments to 3D-printed parts can relieve internal stresses and improve their mechanical properties. For metal parts, heat treatments can increase hardness and strength, while for plastics, they can help achieve a more uniform crystalline structure, enhancing durability.
This method polishes multiple parts simultaneously by tumbling them with a softer medium. It’s particularly effective for metal components, providing a polished finish with minimal effort, though it may not suit parts with sharp edges or precise requirements.
Similar to vibratory systems but gentler, tumbling rotates parts with a polishing medium, which is ideal for delicate parts or those with fine details. It’s a more subtle process that can achieve a high-quality finish without compromising the part’s intricate features.
This finishing technique uses solvent vapors to melt the outer layer of a part, resulting in a glossy surface. It’s beneficial for sealing parts intended to contain liquids or gases, offering an improved barrier against leaks.
As an alternative to vapor smoothing, solvent dipping involves immersing a part in a solvent, which can be more aggressive but allows for finishing larger parts. It shares similar benefits with vapor smoothing, including smoothing and sealing the surface.
Epoxy finishes seal the surface or infiltrate the part, enhancing its resistance to environmental factors and improving strength. While the coating is applied manually, infiltration uses a vacuum to ensure the resin permeates the part thoroughly, offering a durable and resistant finish.
The final touch for many 3D printed parts, painting boosts the visual appeal and provides a protective layer. Proper preparation, including priming and sanding, is key to achieving a flawless finish.
We at Prototlis know how each finishing method offers unique benefits, from enhancing durability and strength to improving appearance. The choice depends on the part’s intended use, material, and the specific properties required for its application.
Why is 3D printing finishing important?
Finishing in 3D printing is crucial for several reasons, impacting the appearance and functionality of printed parts.
- Enhancing Visual Appeal: A polished surface finish significantly enhances the visual appeal of a part. It improves aspects like color, texture, and overall finish, be it shiny or matte, adding value to the final product.
- Optimizing Part Functionality: The functionality of certain parts relies on their surface finish. For example, parts that fit together may need precise surface qualities to function correctly. In some instances, a rough surface is beneficial for increasing heat dissipation.
- Achieving Precision and Tolerances: Finishing processes often help achieve the required dimensional accuracy. They can remove excess material or add layers to ensure a part meets its specified tolerances.
- Improving Physical and Chemical Resistance: Surface finishing can strengthen 3D-printed parts. For instance, metallic parts can receive coatings to resist corrosion and conduct electricity. Some treatments also provide high-temperature and wear resistance for demanding uses.
Overall, finishing is a key step in the 3D printing process, enhancing printed components’ aesthetic and functional qualities.
Understanding surface finish measurement in 3D printing
A device known as a profilometer is used to gauge the surface finish of 3D-printed items. This instrument has a precise, sharp stylus traversing part of the item’s surface to capture its profile.
As it moves, the stylus meticulously records the surface’s contours. These details are then analyzed to determine the surface roughness value—a numerical representation of the surface’s texture.
Evaluating surface roughness
Surface roughness is typically assessed using the Ra value, representing the average height deviation from the surface mean line. This value is a straightforward arithmetic mean of all measured deviations across the sampled surface, clearly indicating the surface’s overall texture.
| 3D Printing Technique | Surface Roughness (Ra) |
| FDM/FFF | 10 |
| SLA/DLP | 3 |
| SLS | 13 |
| PBF | 15 |
The following table illustrates how different 3D printing techniques stack up regarding the smoothness they can achieve on the surface of printed parts, using Surface Roughness (Ra) as a metric.
Common applications of 3D printing
3D printing is revolutionizing various industries by offering innovative solutions to traditional challenges. This technology’s versatility makes it invaluable across numerous fields, from healthcare to aerospace, automotive, consumer goods, and beyond.
Healthcare: Pioneering personalized treatments
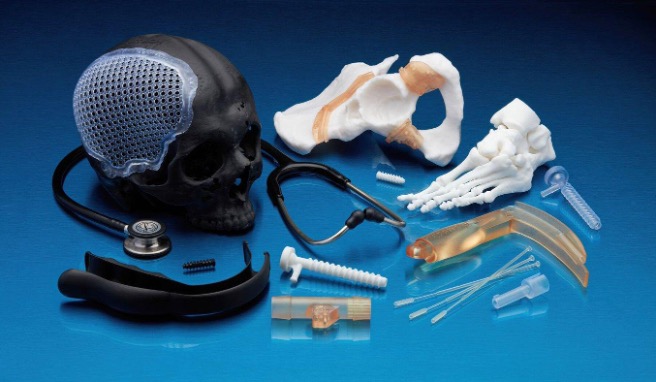
Figure 12: 3D printing medical components
3D printing brings remarkable advancements in healthcare, especially in the medical and dental fields. Some of the applications of 3D printed parts in healthcare and medical industries are:
- Custom Dental Implants: Tailored to individual patients for improved comfort and functionality.
- Prosthetic Limbs: Personalized to match the wearer’s measurements for enhanced aesthetics and functionality.
- Surgical Planning Models: Accurate replicas of organs for better preoperative strategies, leading to safer procedures.
- Drug Delivery Devices: Customized to ensure precise medication dosages for personalized treatment plans.
Aerospace and defense: Achieving efficiency and innovation
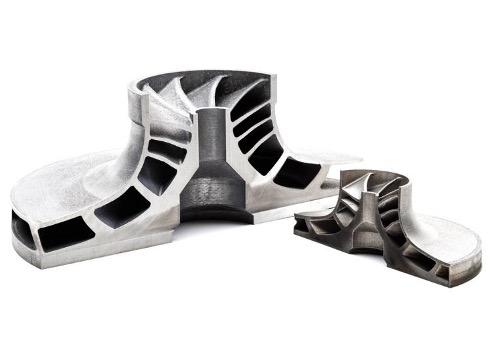
Figure 13: 3D printed aerospace parts
The aerospace and defense sectors benefit greatly from 3D printing’s ability to produce lightweight, durable components. This reduces an aircraft’s weight, saves fuel and costs, and creates complex parts that were previously impossible or too costly to make.
3D printed parts for the aerospace sector include:
- Lightweight Aircraft Components: Parts that reduce overall weight, saving fuel and costs.
- Satellite Components: Designed for efficiency and reduced weight for space missions.
- Engine Parts: Complex designs that improve performance and reduce manufacturing costs.
Automotive: Revolutionizing design and manufacturing
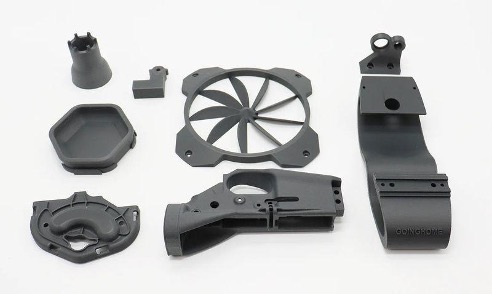
Figure 14: 3D printing car parts
In the automotive industry, 3D printing accelerates the development process by enabling rapid prototyping and manufacturing of rare or customized parts on demand. This technology allows for more creative freedom in design and faster innovation cycles.
The automotive sector uses 3D printing technology for:
- Conceptual Designs: Rapid prototyping of new vehicle designs.
- Replacement Parts: Manufacturing hard-to-find parts on demand.
- Customized Components: Tailoring parts to specific vehicles for improved performance.
Consumer goods: Catering to individual preferences
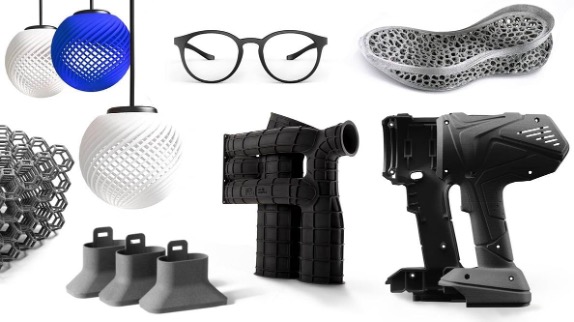
Figure 15: 3D printed consumer goods
In the consumer goods sector, 3D printing meets the growing demand for personalized products, from fashion to functional household items.
- Custom-fit Shoes: Footwear tailored to individual preferences and ergonomics.
- Household Items: Decorative and functional items designed to match personal styles.
- Personal Protective Equipment: Equipment made to fit perfectly, ensuring maximum protection.
Industrial applications: Optimizing production
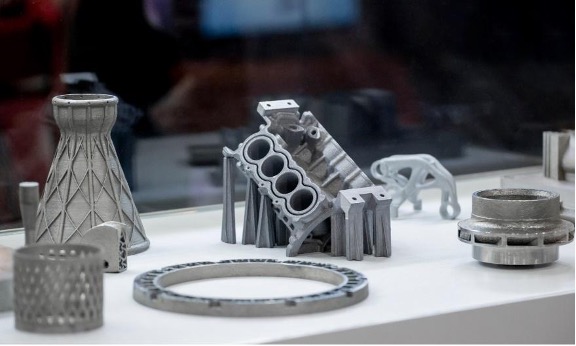
Figure 16: 3D printed industrial parts
Industrial applications of 3D printing are broad, offering efficiencies in manufacturing processes, product development, and even construction. The technology enables the creation of complex designs, reduces waste, and shortens production times.
- Complex Tooling: Intricate tools and molds produced quickly and efficiently.
- Lightweight Structural Parts: Durable components designed for specific applications.
- Rapid Prototyping: Speeding up the innovation process with quick-turn prototypes.
Aeronautics and space travel: Advancing exploration
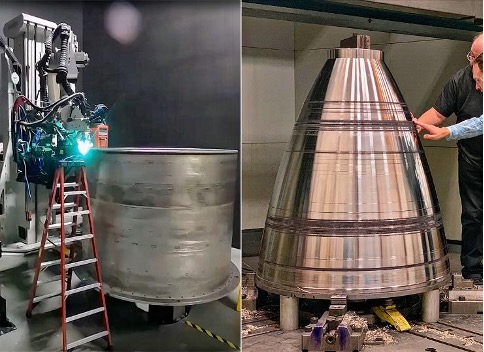
Figure 17: 3D printing rocket nozzle
For the aeronautics and space sectors, 3D printing’s ability to create lighter and stronger parts is invaluable. This leads to more efficient designs and opens new space travel and exploration possibilities.
- Rocket Nozzles: Single-piece nozzles enhance rocket efficiency and reliability.
- Lightweight Frames: Structures that reduce spacecraft weight, enabling longer missions.
- Habitat Modules: Components designed for sustainability in space environments.
Custom clothing and fashion: Personalizing style
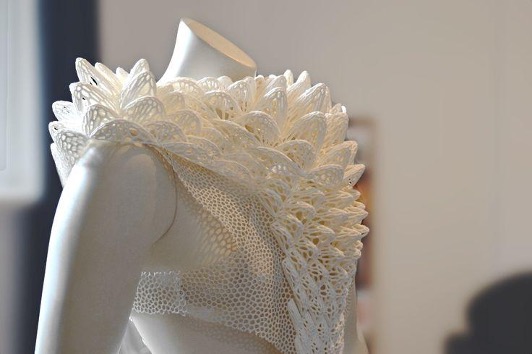
Figure 18: 3D printed clothing
In fashion, 3D printing allows designers to push the boundaries of creativity, producing unique, customized clothing and accessories. The technology’s precise control over materials and designs also supports sustainability efforts by minimizing waste.
- Footwear: Custom-designed shoes for comfort and style.
- Jewelry: Unique pieces that showcase personal aesthetics.
- Accessories: Bags, belts, and more, personalized for the wearer.
Overall, 3D printing’s applications are diverse and expanding, offering transformative possibilities across industries. Its ability to customize, reduce waste, and accelerate development reshapes how we design, produce, and consume products.
Best design practices for 3D printing
Designing for 3D printing is about understanding the intricacies of the process to ensure parts are functional, durable, and visually appealing. Here are enhanced guidelines to help optimize your designs for 3D printing.
Base edges optimization
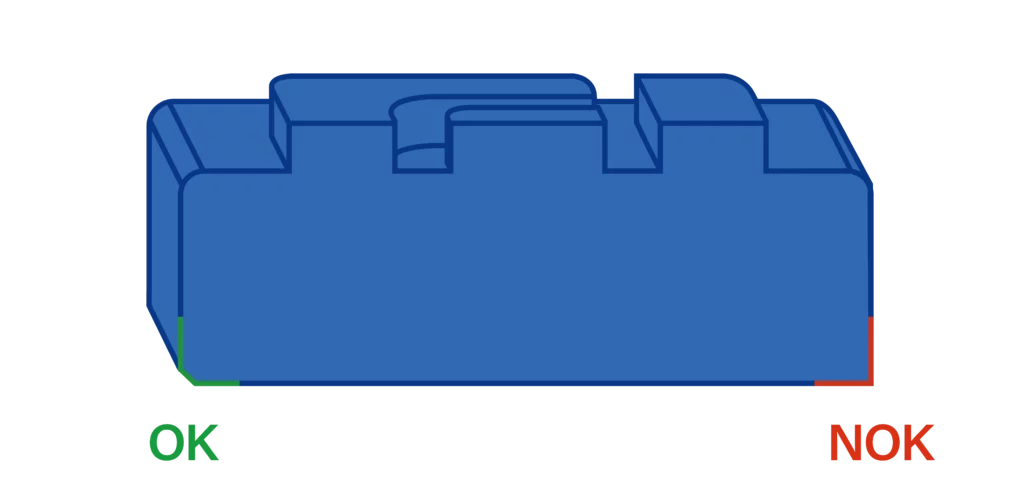
Adding a ~0.3 mm (~0.011 in) chamfer to the base edges prevents the formation of a lip due to the first layer being compressed against the build plate. It is essential for parts to be printed directly on the plate without a brim.
Managing overhangs effectively
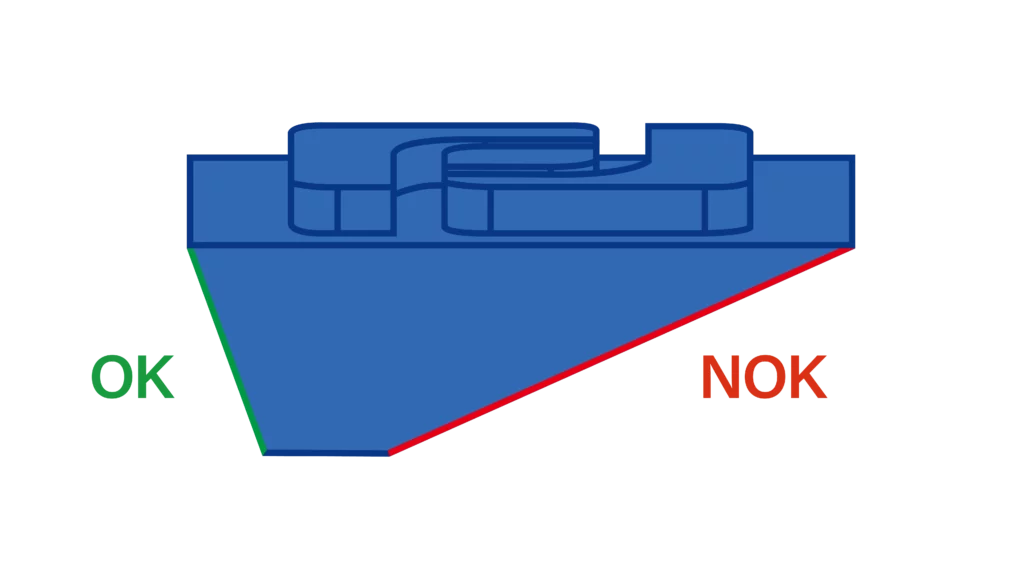
Design overhangs with angles steeper than 50° from the horizontal to avoid the need for supports. Test with your material, as some may perform better than others.
Effective Bridging Techniques
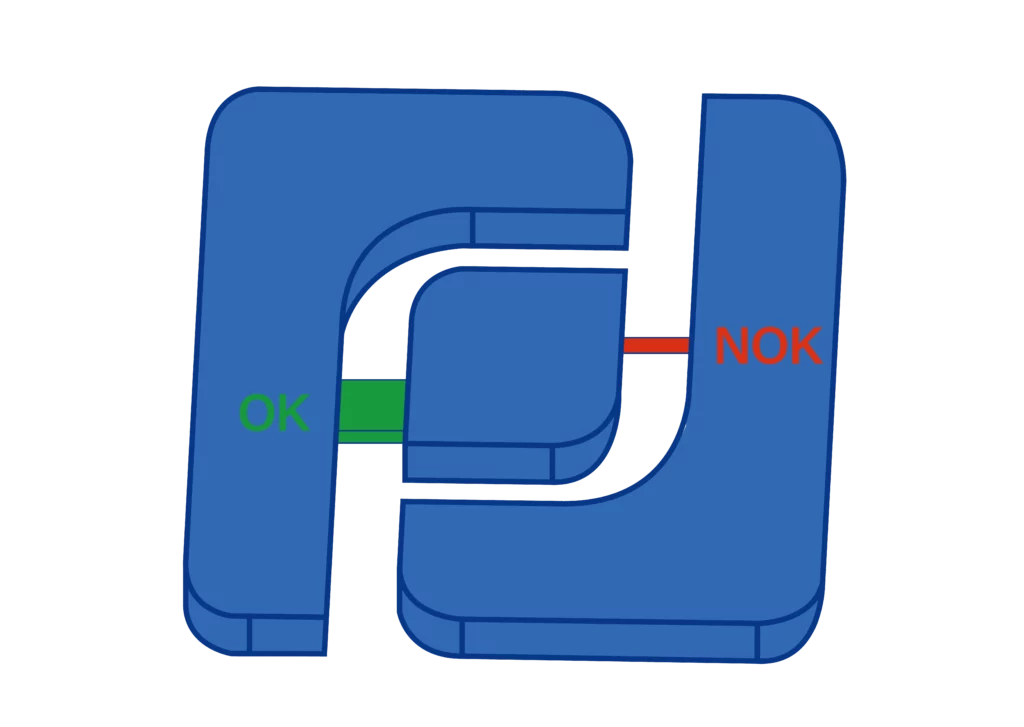
For unsupported spans, keep lengths below 10 mm (0.4 in). Integrate support structures within the design or use software-generated supports for spans longer than 10 mm (0.4 in) to maintain integrity and appearance.
Corner design for stability
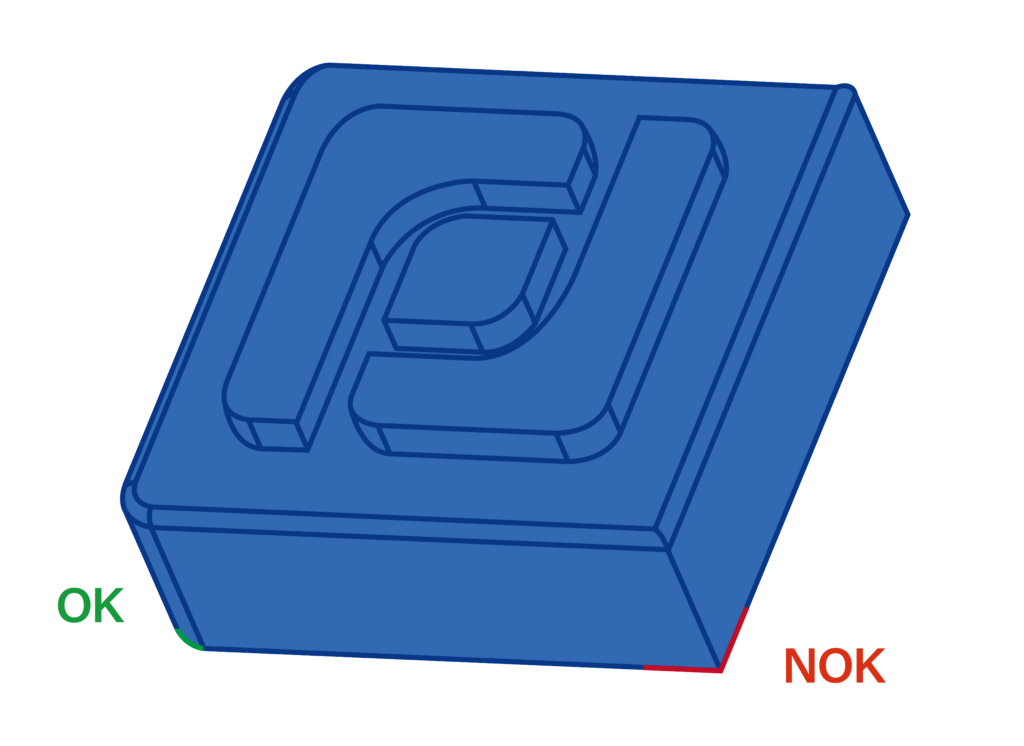
Implement a minimum radius of 4 mm (0.15 in) for corners to distribute cooling stresses and reduce warping. Larger radii are preferable for minimizing deformation in more significant parts.
Right clearance for assembled Parts
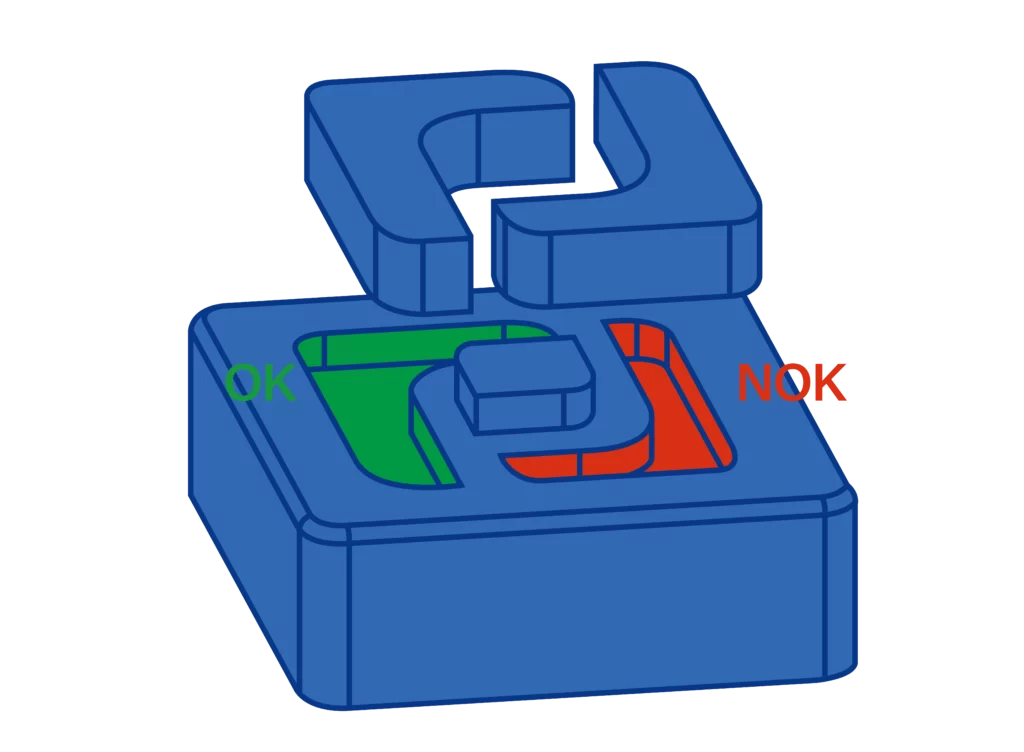
Design clearance of ~0.3 mm (~0.011 in) for parts that fit loosely and ~0.15 mm (~0.006 in) for tighter fits. Adjustments may be necessary based on material shrinkage and printer accuracy.
Feature sizing for reliability
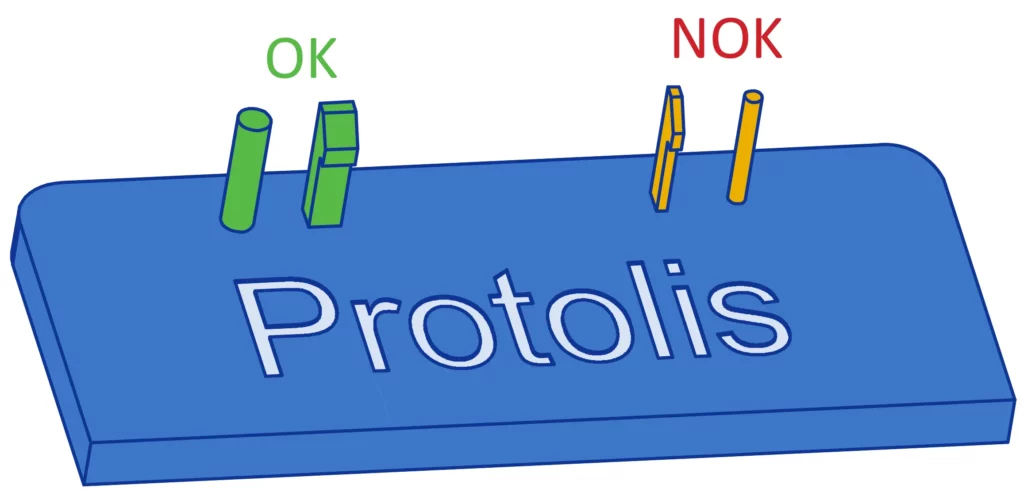
Design features to be at least 1.8 mm (0.070 in) or four times your extrusion line width to ensure they are printed with sufficient detail and strength.
Surface detailing for visibility

The shapes of the markings should be at least twice the width of the extrusion for clarity. Embossed markings should protrude by at least 0.9 mm (0.035 inches), while engraved markings should be at least 0.5 mm (0.019 inches) deep and no deeper than 0.9 mm (0.035 inches) to prevent sagging.
Precise thread

Modeling directly is feasible for threads larger than M5 or UNC #10. For finer threads, post-processing with taps or inserts is recommended for functionality.
Hollow out 3D models
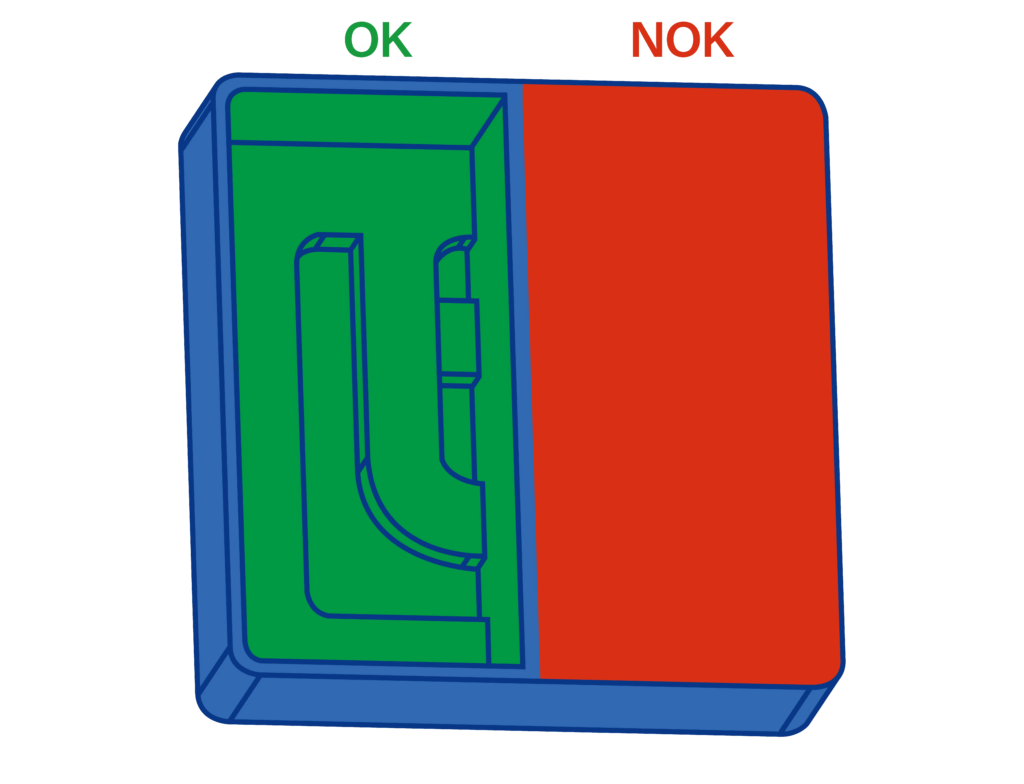
When you’re not printing functional parts that require structural strength, hollowing out your 3D model can be a great way to save a considerable amount of material and time.
By following these detailed guidelines, designers can fully leverage 3D printing’s capabilities, achieving parts that meet or exceed their functional and aesthetic expectations.
If you need 3D part design optimization assistance, our experts at Protolis can help you.
Cost optimisations for 3D printing
Do you want to master your 3D printing costs? This section explores the factors that influence 3D printing prices and offers practical tips to significantly reduce the cost of 3D-printed parts.
What affects the cost of 3D printing?
Several factors influence the cost of 3D printing, making it essential to consider them when estimating the price of a print job.
The cost of 3D printers varies widely, from affordable desktop models to high-end industrial machines. For instance, if you invest in a printer costing around $2,000 and use it for 7 hours daily over two years, the amortized cost per hour could be around $0.39:
7 x 365 x 2 = 5 110 hours
2 000 $ / 5 110 hours = ~0,39 $/hours
Consequently, a 4-hour print job would necessitate adding approximately $1.56 to the price for machine upkeep.
The specifics of the 3D model play a crucial role in determining the cost. Factors such as the total volume of the model, including necessary supports, directly affect material usage. The size and solidity of the model influence the amount of material needed, with larger or solid models requiring more resources and, thus, incurring higher costs. So, according to this, a 4 ft (1.21 meters). hollow model can have less volume as compared to the 1 ft (0.30 meters). solid model.
The complexity of a 3D model significantly impacts the preparation and planning needed for a successful print. Automated systems can handle straightforward designs efficiently. However, complex or intricate models often require manual adjustments or redesigns to ensure printability without wasting materials. For example, a detailed model of a stadium may present challenges like thin walls or intricate internal structures that must be addressed before printing to avoid unnecessary expenses.
The choice of material significantly impacts 3D printing costs, with thermoplastics and resins among the most common selections.
- Thermoplastics: Known for their affordability, materials like ABS and PLA are favorites among enthusiasts, ranging from $20 to $70 per kg. While cost-effective, achieving a high-quality finish requires considerable post-processing. Additionally, printing complex models with thermoplastics poses challenges due to material limitations.
- Resins: Offering superior detail and finish, resins are ideal for intricate projects. However, this comes at a higher price, with standard resins costing around $50 per liter and specialty resins reaching up to $300 per liter. Despite the higher costs, the quality of prints justifies the investment for those seeking precision and detail in their projects.
Post-processing steps significantly influence the overall cost of 3D printing. These steps, necessary for achieving the desired finish and functionality, can range from simple sanding to more complex painting and sealing processes. The time, materials, and equipment required for post-processing vary widely, impacting the final price. A project requiring minimal finishing will be less costly than one needing extensive post-processing to meet specific aesthetic or functional standards.
How to reduce the cost of your 3D-printed part?
Reducing costs in 3D printing involves strategic choices from material selection to design optimization. Here are ways to lower expenses without compromising quality.
1. Opting for economical materials
Selecting more affordable materials can significantly cut down costs. Materials like PLA and ABS are cost-effective options for many projects, offering a good balance between price and performance. Choose the best material that meets your project’s needs without overspending.
| Material Type | Average Price Range (per Kg) |
| Polypropylene (PP) | $23-$53 |
| Standard Engineering Polymers | $30-$60 |
| Flexible Polymers – Elastomers | $40-$88 |
| High-Performance Polymer Powders | $500-$800 |
| PLA | $10-$100 |
| ABS | $20-$150 |
| PETG | $30-$120 |
| HIPS and PVA | $20-$100 (HIPS), $15-$140 (PVA) |
| Flexible Materials | $35-$140 |
| Composite Materials | $35-$250 |
This table provides an overview of how different 3D printing materials can affect the overall cost of printing.
2. Leveraging existing designs
Creating models from scratch can be time-consuming and costly. Utilizing free or existing designs can save substantial amounts of money and effort. Websites like Thingiverse host a vast array of designs that might fit your needs perfectly. These designs often come with improvements made by the community, enhancing printability and functionality.
Note: Always ensure the model’s license permits modification and aligns with your intended use to avoid copyright issues.
3. Designing for hollow structures
Creating hollow models instead of solid ones reduces material usage dramatically, lowering the cost per print. This approach is particularly effective for large objects where internal solidity is not crucial. Adjusting wall thickness and infill settings can help maintain structural integrity while using less material.
4. Minimizing support structures

Figure 19: Reducing support structures during 3D printing
Support structures are essential for creating parts with overhangs but increase material use and production time. By designing parts with overhangs greater than 45 degrees or splitting your model, you can reduce or eliminate the need for support, saving both materials and costs.
5. Optimizing infill density
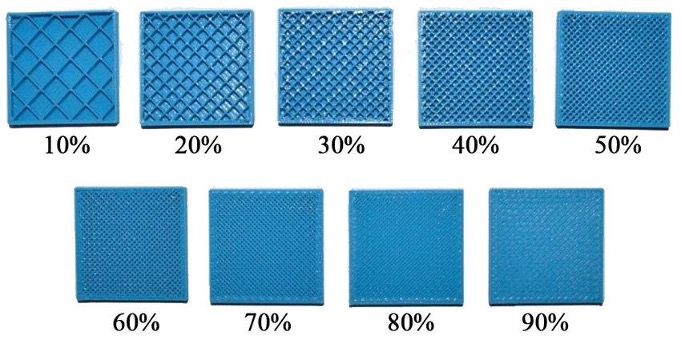
Figure 20: Infill density
Lowering the infill percentage to a range between 20% and 50% can significantly decrease material consumption without compromising the structural integrity of non-load-bearing parts. This approach enhances efficiency and is particularly effective for objects that don’t require high strength or density.
6. Cutting costs by reducing Z-height
- Streamlining vertical height: 3D printing builds objects layer by layer, each adding to the overall height. You can significantly reduce printing time by minimizing the Z-height or vertical dimension of your part. This is because each layer’s addition involves mechanical movements, material recoating, and potentially printhead cleaning, all of which contribute to longer build times and higher costs.
- Strategic part splitting: In some cases, dividing a tall part into smaller sections that can be printed separately and assembled can be more cost-effective. This approach reduces the machine’s operational time between layers, focusing expenditures on the material used rather than on machine time.
Z-height and build size by 3D printing technique
| 3D Printing Technique | Recommended Z-Height | Build Area Size |
| Selective Laser Sintering (SLS) Unfilled | Under 330.2 mm (under 13 in) | 330.2 x 330.2 x 508 mm (13 in x 13 in x 20 in) |
| Selective Laser Sintering (SLS) Glass-filled | Under 381 mm (under 15 in) | 660.4 x 381 x 584.2 mm (26 in x 15 in x 23 in) |
| Stereolithography (SLA) | Under 406.4 mm (under 16 in) | 736.6 x 635 x 533.4 mm (29 in x 25 in x 21 in) |
| HP Multi Jet Fusion (HP MJF) | Under 279.4 mm (under 11 in) | 381 x 279.4 x 381 mm (15 in x 11 in x 15 in) |
| Fused Deposition Modeling (FDM) | Under 406.4 mm (under 16 in) | 914.4 x 609.6 x 914.4 mm (36 in x 24 in x 36 in) |
| PolyJet | Under 177.8 mm (under 7 in) | 482.6 x 381 x 177.8 mm (19 in x 15 in x 7 in) |
| Direct Metal Laser Sintering (DMLS) | Under 127 mm (under 5 in) | 228.6 x 228.6 x 228.6 mm (9 in x 9 in x 9 in) |
| Carbon DLS | Under 762 mm (under 3 in) | 188 x 116.8 x 325.12 mm (7.4 in x 4.6 in x 12.8 in) |
Keeping parts within these recommended dimensions can help ensure quality prints and cost efficiency.
Implementing these tactics can lead to substantial savings in 3D printing projects, especially for complex models, making 3D printing more accessible and cost-effective.
Conclusion
We have explored the intricate world of 3D printing, showcasing its vast capabilities, from design freedom to sustainable manufacturing. We’ve covered essential aspects such as material selection, design optimization, and cost-reduction strategies.
Protolis stands at the forefront of 3D printing offering efficient services that ensure high-quality outputs tailored to your needs. Find out how we can transform your concepts into reality with precision and care. Contact us today.